Sunday, October 30, 2011
Need to find a new tile contractor...
Well, I ended up firing our tile contractor. Why? I found out that he was stealing materials. I've been buying the fancy thinset for him to use, and apparently he's been swapping it with a much cheaper thinset to make an extra $5-10 per bag of thinset. It is just disappointing when people try to screw you over for a few bucks while they can make thousands from the job and future referrals. Anyway, people are free to make their own decisions. I just hope those tiles will hold well with the cheap thinset.
Thursday, October 27, 2011
Tile installation in progress
Just a quick update on the tile installation. Kitchen/family area install is complete and ready for grout application.. More to come later..


Saturday, October 22, 2011
Floor demolition complete, prep for tile installation in progress
Our tile installer and his team has completed removing all the VCTs and carpeting in the hallway. They've been scraping the mastic for a day or so, and here is what the floor looks like after removing VCTs and scraping most of the mastic:


While most areas are clean enough to get proper thinset bonding, some areas still have too much mastic like the area closer to where I am standing while taking the picture above. Therefore, Jake and his team are going use a grinder on those areas to clean them further.
After all the grinding and additional cleaning, we've applied some RedGard to prevent against cracking of grout over time as the concrete slab develops cracks or as existing cracks grow (and yes there are cracks on our slab). We've applied only one very thin coat of RedGard, because I've read on the "Internets" that it's got some insulating capabilities (note that it is a bad idea to put insulation on a radiant heated slab). So, just in case, we've had a very thin roll put on just to give some cracking protection. This is what it looks like while it is drying:

Next... setting the chalk lines and tile installation! Stay tuned..
Friday, October 21, 2011
Panel upgrade and kitchen electrical complete!
The panel upgrade was completed today, and we have power! PG&E finally connected the power today (not yesterday as scheduled). Here is the picture of the new panel prior to meter re-connect.


Note that the additional circuits for the kitchen are not in yet. However, some circuits have already been upgraded. Specifically, the 220 volt circuits going to the kitchen for oven and cooktop thru existing conduits. Let's talk about conduits... There is the original 3/4" metal conduit under the kitchen island as seen i the picture below.

The second 1/4" conduit is for telephone line. The original 3/4" conduit carried a 220V 30A 3-wire circuit on 10-gauge wires. We want to have our cooktop on the island too, however most cooktops require a 40A circuit. Frankly, even if you crank up all heaters to max at the same time, then it gets close to 30A, so for all practical purposes 30A should be enough, but I am sure city inspector would disagree. So we've run new 8-gauge 4-wires for a 40A circuit plus a 20A circuit for island outlets.
Similarly, we've pulled a new 40A circuit for the oven through the existing conduit.
What about the additional circuits to the kitchen in order to bring it up to code? We've decided to run them in a conduit in a trench. The conduit will come out of the ground right infront of the 2' kitchen wall in back elevation, terminate at the outside junction box and then the wires go into the kitchen wall. Here is what that junction box looks like:

Note that the conduit and trench is not there yet. Sergio and his team will be digging the trench and laying the conduit pipes next week.
The box is kind of an eyesore, but I think it will blend in once I paint over it. The alternative way of running additional circuits is through the roof. The downside with the roof approach is that it is harder to service (especially if you foam over it) and leak risk is relatively higher especially with flat roofs.
Kitchen has been rewired to code too. Here is what the new kitchen wiring looks like:

Note that we've also added an outlet to be hidden behind the wall cabinet above the sink. This is for future countertop lighting needs.
More to come once we dig the trench and run the new circuits.
Update on Nov 2nd:
The trench work is complete. Sergio and his team has laid the conduit and ran wires through it.

Wednesday, October 19, 2011
Electrical panel upgrade
While flooring work is going on, we're also upgrading the electrical panel. The old panel is the original 100amp Zinsco panel from late 1950s. Apparently this panel was very popular during those days, however they're now known for their failure to operate properly and carry a higher risk of fire / electric shock. Well, that panel has been working since 1950s, so the odds are that it will continue working fine for the foreseeable future. Nevertheless, kitchen remodel requires additional circuits, and just the oven and cooktop take up 40+40=80amp of the panel, so this is a good time to get the panel upgraded to a 200amp one while we're here.
The new panel is Square D brand , and our electrician Sergio from S&R electric will perform the installation. Here is how the process works:
- Pull a permit from city (without permit and city inspector OK, PG&E will not connect power to your new panel)
- PG&E disconnects power
- Remove old panel
- Put in new panel
- Inspector OKs
- PG&E reconnects power.
Here is the old panel coming out:

Once the old panel is out, the new panel goes in. Note that this one is much bigger, and it is surface mount rather than embedded into the siding. Our electrical contractor Sergio recommended going with a surface mount panel as it would be easier to pull new circuits from it in the future.

More to come later on panel upgrade..
That old VCT is coming out!
Here is what the old VCT floors look like:


I've got nothing against VCT, and VCT can sometimes be really nice (i.e. redneck modern blog with cool shiny black Armstong VCT). However, previous owners went with a brown colored VCT, and thart brown looks really bad in my opinion. It is currently everywhere other than the bedrooms. The good thing is that it is newer VCT, so we don't have to deal with the original 1950s asbestos tiles and mastic! Previous installers apparently removed all.
What's the plan? We'll rip out all the VCT and replace it with modern 12x24 tile. Our choice of tile is the Sintesi Glamour Grey (Brochure).
Our tile contractor will remove all the VCT, and lay the tile. The team have started removing the VCTs in the kitchen area yesterday.
Removing VCt is difficult, scraping off the old mastic is even more difficult. Kitchen is halfway done. There is about 900 more sqft more to go! We'll update as we remove the floor, prep it and start laying the tile!
Wednesday, October 12, 2011
Kitchen Demo - Discoveries
Ok, so cabinets are out of the kitchen. The kitchen island is gone too. The paneling is removed from the wall between kitchen and living room. Here are some interesting observations:
First of all take a look at the wall and how it barely touches the beam above it!


First of all take a look at the wall and how it barely touches the beam above it!

I wasn't expecting the beam to be supported by a wall since these houses are post-beam construction anyway, but I wasn't expecting this either. So, it is probably possible to remove this wall (disclaimer: don't believe everything you read on the internet, check with a structural engineer)
Of course, you need to figure something for all the wires in that wall and probably replace that vent pipe with whatever mechanism people use in kitchen islands with plumbing inside.
Oh, by the way, here is a little block of wood filling some of that gap.

I wonder if that is original. What would happen if I pull it out? Could it be holding up the entire structure like a keystone? :)
Discovery #2:
There is a 220v conduit coming in right behind where I was planning to put the oven in. That will make our life easier in terms of getting all the proper circuits for the new kitchen. Look who is hiding in that corner.

Discovery #3:
In addition to the electrical conduit coming to the island, there is a smaller conduit with telephone line in it. I haven't had a land line for more than 10 years, so not sure what to do with it. Still I want to make use of that conduit somehow since it is buried in the concrete slab. Ideas? :)
More to come on conduits, electrical etc. later...
Kitchen wing wall update, we have a solution!
We were discussing this problem with our contractor Michael, and Michael came up with a great idea: We cut the wall and move the wall as planned..we keep the wires at their location, and cover the wires with a box around them. We'll shape the box such that it will look like a cross-beam. Great way to match the Eichler look!
By the way, here is what the wall looks like after being cut:
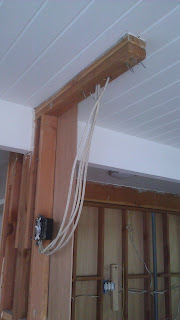 Use your imagination to figure out what it will look like when we do the fake-cross-beam cover around it all the way to the right-most wire. Anything to the right will be cutoff..
By the way, here is what the wall looks like after being cut:

Tuesday, October 11, 2011
Kitchen Demo -- the wing wall
We want to trim the kitchen wing wall by 2 feet. I was hoping that it is just a simple cut wall, reposition light switch, and close the wall operation. Of course something has to go wrong.

Our contractor Michael removed the paneling on that wing wall, and we have a problem. The wires from that light switch are going straight up into the roof. They travel buried in the tar&gravel roof all the way to the light fixtures in the kitchen.
Here are some before/after pics.
You are greeted by the wall as you enter from the atrium:

Here are some before/after pics.
You are greeted by the wall as you enter from the atrium:

Paneling is removed:

Now we have to figure out a way to relocate those wires, otherwise we won't be able to shorten the wall. Time to discuss with our electrician Sergio from S&R Electric.
Sunday, October 9, 2011
Starting the kitchen remodel...
We are finally starting the heavy work: The Kitchen! Here is the plan:
- Remove those old cabinets and replace them with glossy white cabinets from Ikea for a minimalist and modern look.
- Remove those brand new quartz countertops the sellers have just slapped onto the old cabinets to sell the place. I hate wasting things, so some of those countertops and cabinets are going to the garage to form a workbench. Details TBD..
This is what the cabinets and countertops look like today. Not bad actually.. but I don't want to remodel once I move in..

- That wing wall at atrium entry.. I just don't like it. If that wall wasn't there, then one standing in the kitchen could have seen the atrium, and there would have been a much better flow: atrium->kitchen/family room->backyard through those nice floor to ceiling windows. I ideally would remove that entire wall, but my wife wants to keep some of it as it is used as a backer for high cabinets. She has a very good point, we actually need to live in this kitchen, so here is our solution: We'll cut half of the wall, get some more openness and still maintain some cabinet space.

Who is going to do all this work? Well, I was initially planning DIY, but then I chickened out and found a great contractor. Michael and Celina (husband and wife team) from Michael Pellegrino Construction are going to do the demolition, wall removal and install the new kitchen. What am I going to do?Assemble some Ikea cabinets.
Did I tell you that Ikea cabinets look great at a fraction of the cost of custom cabinets? All cabinet shops told me that Ikea cabinets will not stand against time, and won't last 10-20 years. I figured I can replace my kitchen with Ikea cabinets every 10 years and still save money compared to custom cabinets across a span of 30 years.
Ok less talking, more planning, let me go back to re-measuring the kitchen so that cabinets actually fit!
Sunday, October 2, 2011
Floor plans...
Why is it so hard to find the floorplan for my Eichler? I think my plan is known as E-11 by Ashen & Allen, and it is the 1755 sqft atrium, flat roof model one can find all over Fairbrae and Fairglen communities in Sunnyvale and San Jose. There are probably 500 eichlers with this floorplan, but I can only find one lousy stamp sized black and white image when I google this plan.
That is enough! I took this matter in my own hands, measured all the rooms in the house, downloaded a free drawing program, and drew my own plan! (As if I don't have fifty other things I have to do by tomorrow for my real job so that I can pay for this mortgage) Boys and girls, here is my plan:

That is enough! I took this matter in my own hands, measured all the rooms in the house, downloaded a free drawing program, and drew my own plan! (As if I don't have fifty other things I have to do by tomorrow for my real job so that I can pay for this mortgage) Boys and girls, here is my plan:

Ok, so I felt lazy at the end and didn't bother putting in the dimensions for the bedrooms. Perhaps, I may have screwed up the scale while drawing the bedrooms, but hey this is much better than what you'll find on google. I am sure you can figure out what is a wall, what is a glass panel, what is a sliding glass door etc.
Saturday, October 1, 2011
Why do I blog?
Frankly here is what I thought of blogs and bloggers for a long time: Yawn..
That's because I've been seeing blogs like "Oh I've eaten this today, and I saw this movie, blah blah.." I just don't understand why people blog about boring everyday stuff. Same applies to most facebook updates.. But, hey, I understand everyone likes to have that feeling of having an audience, and feeling important.
Then, one day, I came across two great, informative blogs while I was researching Eichlers and renovation ideas. Redneck Modern and Dan's EichlerEichler blogs are great resources for anyone who is interested in midcentury modern houses or renovating one of those. Inspired by these two great blogs, I've decided to document my renovation experience and share it with fellow Eichler/MCM owners. If you are reading this, I hope you'll benefit from reading my blog and somewhat better prepared when it comes to renovating your Eichler.
Subscribe to:
Posts (Atom)